GDW-106 Intelligent Oil Dew Point Meter&Micro-Moisture Tester


● The following instructions are used by qualified person to avoid electrical shock. Do not perform any service beyond operation instructions unless you are qualified to do so.
● Don't operate this device in flammable and moist environment. Keep the surface clean and dry.
● Please make sure the equipment is upright before opening. Don't drop equipment heavily avoid equipment movement damage.
● Place the equipment in dry, clean, ventilated area free from corrosive gas. Stacking equipment without transit containers is dangerous.
● Panel should be upright during storage. Elevate stored items to protect from moisture.
● Don't disassemble the instrument without permission, which will affect the warranty of the product. The factory is not responsible for self-dismantling.
The warranty period for this series is ONE year from the date of shipment, please refer to your invoice or shipping documents to determine appropriate warranty dates. HVHIPOT corporation warrants to the original purchaser that this product will be free from defects in material and workmanship under normal use. Throughout the warranty period, provide that such defects are not determined by HVHIPOT to have been caused by abuse, misuse, alteration, improper installation, neglect or adverse environmental condition, HVHIPOT is limited solely to repair or replacement of this instrument during the warranty period.
|
No. |
Name |
Qty. |
Unit |
|
1 |
GDW-106 Host |
1 |
piece |
|
2 |
Electrolytic cell bottle |
1 |
piece |
|
3 |
Electrolytic electrode |
1 |
piece |
|
4 |
Measuring electrode |
1 |
piece |
|
5 |
Electrolytic cell injection plug |
1 |
piece |
|
6 |
Large glass grinding plug |
1 |
piece |
|
7 |
Small glass grinding plug (notch) |
1 |
piece |
|
8 |
Small glass grinding plug |
1 |
piece |
|
9 |
Stirring rod |
2 |
pcs |
|
10 |
Silica gel particles |
1 |
bag |
|
11 |
Silica gel pad |
9 |
pcs |
|
12 |
0.5μl micro sampler |
1 |
piece |
|
13 |
50μl micro sampler |
1 |
piece |
|
14 |
1ml micro sampler |
1 |
piece |
|
15 |
Straight dry tube |
1 |
piece |
|
16 |
Power cord |
1 |
piece |
|
17 |
Vacuum grease |
1 |
piece |
|
18 |
Electrolyte |
1 |
Bottle |
|
19 |
Print paper |
1 |
roll |
|
20 |
User’s guide |
1 |
piece |
|
21 |
Test report |
1 |
piece |
HV Hipot Electric Co., Ltd. has strictly and carefully proofread the manual, but we can not guarantee that there are no errors and omissions completely in the manual.
HV Hipot Electric Co., Ltd. is committed to making continuous improvement in product functions, and improving service quality, so the company remains the right to change any products and software programs described in this manual as well as the content of this manual without prior notice.
Coulometric Karl Fischer technology is applied to measure precisely trace moisture the measured sample contains. The technology is widely used for accuracy and cheap test cost. The model GDW-106 measure precisely trace moisture on liquid, solid and gas samples according to the technology. It's used in electricity, petroleum, chemicals, foods and so on.
This instrument uses powerful new generation processing units and brand new peripheral circuit and that the superior low power consumption make it capable to use small size storage battery and portable. Judging the electrolysis endpoint is based on testing electrode signal and the stability and accuracy are the vital factors of determination precision.
● 5-inch high-definition color touch screen, the display is clear and easy to operate.
● Two methods of electrolyte blank current compensation and balance point drift compensation to revise testing results.
● Functions of detecting measuring electrode open circuit fault and short circuit fault.
● Adopts thermal micro printer, printing is convenient and fast.
● 5 calculation formulas are built in the instrument, and the calculation unit of test results (mg / L, ppm%) can be selected as required.
● Automatically save history records with time tab, maximum to 500 records.
● Blank current microprocessor automatically controls compensation, and reagents can quickly reach equilibrium.
● Measurement Range: 0ug-100mg;
● Measurement accuracy:
Electrolysis water Accuracy
3ug-1000ug ≤±2ug
>1000ug ≤±02% (the above parameters do not include injection error)
● Resolution: 0.1ug;
● Electrolyzing Current: 0-400mA;
● Max power consumption: 20W;
● Power Input: AC230V±20%, 50Hz±10%;
● Operating Ambient temperature: 5~40℃;
● Operating Ambient humidity: ≤85%
● Dimension: 330×240×160mm
● Net weight: 6kg.
Instrument Structure and Assembly
1. Host


Figure 4-1 Host
2. Electrolytic Cell
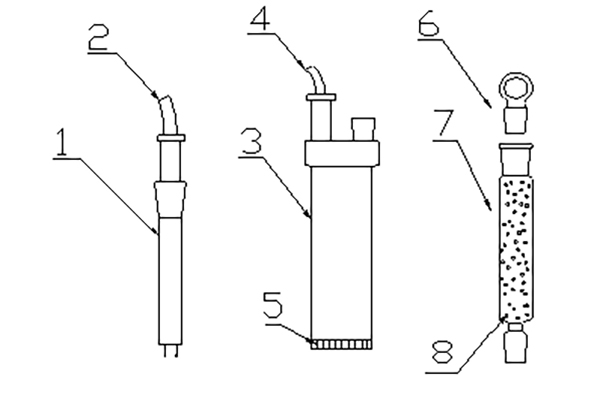
Figure 4-2 Electrolytic cell decomposition diagram
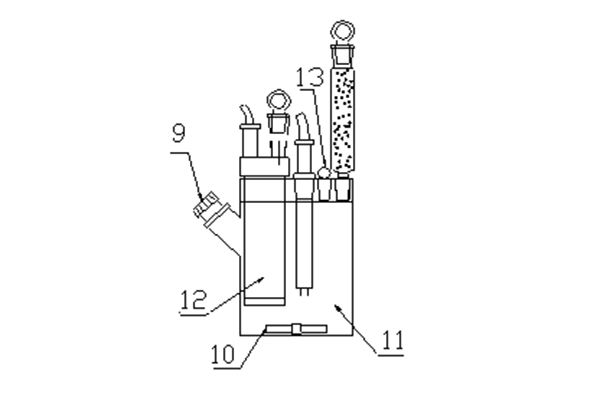
Figure 4-3 Electrolytic cell assembly drawing
1.Measuring electrode? ?2. Measuring electrode lead? 3. Electrolytic electrode? ? ? ? ? 4. Electrolytic electrode lead? ?5. Ion filter membrane? ?6. Drying tube glass grinding plug? 7. Drying tube? 8. Allochroic silicagel (drying agent)? 9. Sample entrance? 10. Stirrer? ? 11. Anode chamber? ?12. Cathode chamber? ?13. Electrolytic cell glass grinding plug
● Put the blue silicone particles (drying agent) into drying tube(7 in Fig. 4-2).
Note: The pipe of the drying tube must maintain a certain air permeability and cannot be completely sealed, otherwise it is easy to cause dangerous!
● Insert the milky white silicone pad into the cock and screw it evenly with the fastening studs (see Fig. 4-4).
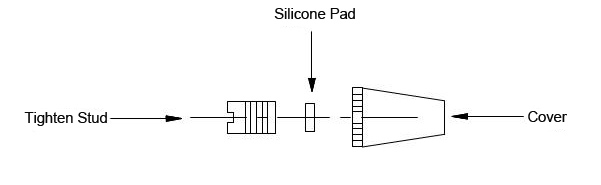
Figure 4-4 Injection plug assembly drawing
● Carefully place the stirrer into the electrolytic bottle through the sample entrance.
● Evenly spread a layer of vacuum grease on the measuring electrode, electrolytic electrode, cathode chamber drying tube, and inlet cock grinding port. After inserting the above components into the electrolytic bottle, gently rotate it to make it better sealed.
● About 120-150 ml of electrolyte is injected into the anode chamber of the electrolytic cell from the electrolytic cell sealing port with a clean and dry funnel (or using a liquid changer), and also injected into the anode chamber of the electrolytic cell from the electrolytic electrode sealing port by a funnel (or using a liquid changer), to make the electrolyte level inside the cathode chamber and anode chamber is basically the same. After finishing, the glass grinding plug of the electrolytic cell is evenly coated with a layer of vacuum grease and installed in the corresponding position, gently rotated to make it better sealed.
Note: The above electrolyte loading work should be carried out in a well ventilated environment. Do not inhale or touch the reagents by hand. If it is in contact with the skin, rinse it with water.
After completing the above steps, place the electrolytic cell into the electrolytic cell support (9 in Fig. 4-1), insert the electrolytic electrode connection wire with the lotus plug and the measuring electrode connection wire into the electrolytic electrode interface ( 7 in Fig. 4-1). ) and the measuring electrode interface (8 in Fig.4-1).
The reagent solution is a mixture of iodine, pyridine filled with sulfur dioxide and methanol. The reaction principle of Karl-Fischer reagent with water is: based on the presence of water, iodine is reduced by sulfur dioxide, and in the presence of pyridine and methanol, pyridine hydroiodide and methyl hydrogen hydrogen pyridine are formed. The reaction formula is:
H20+I2+SO2+3C5H5N → 2C5H5N·HI+C5H5N·SO3 …………(1)
C5H5N·SO3+CH3OH → C5H5N·HSO4CH3 …………………(2)
During the electrolysis process, the electrode reaction is as follows:
Anode: 2I- - 2e → I2 .......................................(3)
Cathode: 2H+ + 2e → H2↑.......................................(4)
The iodine generated by the anode reacts with water to form hydroiodic acid until the completion of the reaction of all the water, and the end of the reaction is indicated by a detection unit composed of a pair of platinum electrodes. According to Faraday's law of electrolysis, the number of molecules of iodine participating in the reaction is equal to the number of molecules of water, which is proportional to the amount of electric charge. The amount of water and charge has the following equation:
W=Q/10.722 ……………………………………………(5)
W--moisture content of the sample Unit: ug
Q--electrolysis quantity of electric charge Unit: mC
The instrument adopts large-screen LCD, and the amount of information that can be displayed on each screen is richer, which reduces the number of switching screens. With the touch buttons, the functions of the buttons are clearly defined, easy to operate.
The instrument is divided into 5 display screens:
● Boot welcome screen;
● Time setting screen;
● Historical data screen;
● Sample test screen;
● Measurement result screen;
1. Boot Welcome Screen
Connect the instrument power cord and turn on the power switch. The LCD screen displays as shown in Figure 6-1:

2.Time Setting Screen
Press the "Time" button in the interface of Figure 6-1, and the LCD screen will display as shown in Figure 6-2:

In this interface, press the numeric part of time or date for 3 seconds to set or calibrate the time and date.
Press  ?key to back to boot interface.
3. Historical Data Screen
Press the "Data" button in the screen of Figure 6-1, and the LCD screen will display as shown in Figure 6-3:

Press ?
? key to change pages.
Press Key to delete current data.
Press key to print current data.
Press key to back to boot interface.
4. Sample Test Screen
Press the "Test" button in the screen of Figure 6-1, the LCD screen will display as shown below:

If the electrolyte in the electrolytic cell is newly replaced, the current status will display "Reagent over iodine, please fill with water". After slowly injecting water into the anode chamber with a 50ul sampler until the electrolyte turns pale yellow, the current status will display "Please waiting", and the instrument will automatically balance.
If the electrolyte in the electrolytic cell has been used, the current status will display "Please waiting", and the instrument will automatically balance.
Pre-conditioning begins, i.e. the titration vessel is not dried. “Please waiting” will display, instrument auto titrating extra water.
Press Key to select items.
Press Key to start the test.
Press key to back to boot interface
4.1 In this interface, press the "Set" key, set the stirring speed and Ext. time.

Figure 6-5
Click the stirring speed (number part) to set the stirring speed of the instrument. Click the Ext. time (number part) to set the delay time of the end point of the test.
Stirring speed: When the viscosity of the tested sample is large, the stirring speed can be properly increased. Subject to no bubbles in the stirring electrolyte.
Ext. Time: When it is necessary to extend the test time of the sample, such as poor solubility of the sample and the electrolyte or test water content of the gas, the test time can be appropriately extended. (Note: When Ext. time is set to 0 minutes, the test is completed after the electrolysis speed of the instrument is stable. When the Ext. time is set to 5 minutes, the test is continued for 5 minutes after the electrolysis speed of the instrument is stable)
4.2 After the instrument balance is completed, the current status will display "Press <start> key to measure". At this time, the instrument can be calibrated or the sample can be directly measured.
To calibrate the instrument, use a 0.5ul sampler to take 0.1ul of water, press the "Start" key, and inject it into the electrolyte through the sample inlet. If the final test result is between 97-103ug (imported sampler), it proves that the instrument is in a normal state and the sample can be measured. (The test result of the domestic sampler is between 90-110ug, which proves that the instrument is in a normal state).

4.3 Sample Titration
When the instrument is balanced (or calibrated), the current state is "Titrating", then the sample can be titrated.
Take a proper amount of sample, press the "Start" key, inject the sample into the electrolyte through the sample inlet, and the instrument will automatically test until the end.

Note: The sampling volume is appropriately reduced or increased according to the estimated water content of the sample. A small amount of sample can be taken with the 50ul sampler for testing. If the measured water content value is small, the injection volume can be appropriately increased; If the measured water content value is large, the injection volume can be reduced appropriately. It is appropriate to keep the final test result of the water content between tens of micrograms and hundreds of micrograms. Transformer oil and steam turbine oil can be directly injected of 1000ul.
5. Measurement Results

After the sample test is completed, the calculation formula can be switched as required, and the number on the right side of the calculation formula can be switched between 1-5. (corresponding to ppm, mg/L and % respectively)
Typical measurement range of this instrument is 0μg-100mg. In order to obtain accurate testing results, the amount of injected sample should be controlled properly as per the moisture content of test sample.
1. Liquid sample
Measurement of liquid sample: tested sample should be extracted by sample injector, then be injected into the anode chamber of electrolytic cell through injection port. Before sample injection, needle must be cleaned with filter paper. And needle tip should be inserted into electrolyte without contacting with the inwall of electrolytic cell and electrode when test sample is injected.
2. Solid sample
Solid sample could be in the form of flour, particle or block mess(large block mass must be mashed). A suitable water evaporator shall be chosen and connected to the instrument when test sample is hard to dissolved in reagent.
Taking the solid sample which could be dissolved in reagent as an example to explain solid sample injection, as follows:
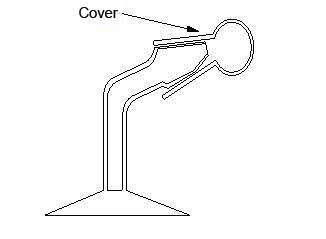
Figure 7-1
1) Solid sample injector is shown as figure 7-1, clean it up with water and then dry it well.
2) Take down the lid of solid sample injector, inject test sample, cover the lid and weigh accurately.
3) Take down the plug cock of electrolytic cell sample injection port, insert sample injector into injection port according to the full line shown as figure 7-2. Rotate solid sample injector for 180 degrees shown as the dotted line in figure 7-2, making test sample drop in reagent till the measurement is over. In the process of it, solid test sample can no be contacted with electrolytic electrode and measured electrode.

Figure 7-2
Weigh the sample injector and lid accurately again after injecting. Sample quality can be calculated according to the difference between two weighs, which can be used to calculate water content ratio.
3. Gas sample
In order that moisture in gas could be absorbed by reagent, a connector shall be used to control test sample to be injected into electrolytic cell at any time.(see figure 7-3). When moisture in gas test sample is measured, reagent about 150ml should be injected into electrolytic cell to guarantee that moisture could be absorbed fully. At the same time, gas flow velocity shall be controlled at 500ml per min. approximately. In case that reagent reduces obviously in the process of measuring, about 20ml glycol should be injected as a supplement. (other chemical reagent can be added as per actual measured sample.)
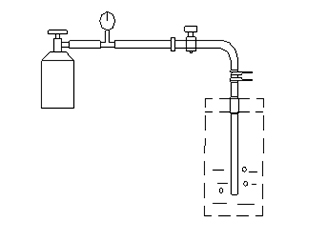
Figure 7-3
A. Storage
1. Keep away from sunshine, and room temperature should be within 5℃~35℃.
2. Don't install and operate it under the environment with high moisture and big fluctuation of power supply.
3. Don't place and operate it under the environment with corrosive gas.
B. Replacement of silicone pad
Silicone pad in sample injection port should be changed timely due to the fact that long-term usage of it will make pinhole non-contractile and let moisture in, which will have an effect on measurement.(see figure 4-4)
1. Replacement of allochroic silicagel
Allochroic silicagel in drying pipe should be changed when its color turns light blue from blue. Do not place silicagel powder in drying pipe when replacing, otherwise exhaust of electrolytic cell will be blocked resulting in the termination of electrolysis.
2. Maintenance of electrolytic cell polishing port
Rotate the polishing port of electrolytic cell every 7-8 days. Once it can’t be rotated easily, coat with vacuum grease thinly and install again, otherwise it is hard to dismantle if service hours is too long.
If the electrode can not be taken down, please don't pull it out forcibly. At this moment, to dip the whole electrolytic cell in warm water for 24-48 hours constantly, then to use it.
3. Cleaning of electrolytic cell
Open all rim of glass bottle of electrolytic cell. Clean electrolytic cell bottle, drying pipe, sealing plug with water. Dry it in oven(oven temperature is about 80℃) after cleaning, then cool it down naturally. Absolute?ethyl?alcohol can be used to clean electrolusis electrode, while water is forbidden. After cleaning, dry it with dryer.
Note: Don’t clean the electrode leads, as shown figure 8-1
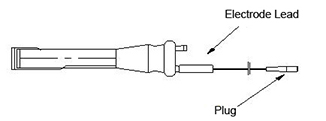
Figure 8-1
C. Replace Electrolyte
1. Take the electrolytic electrode, measuring electrode, drying tube, injection plug and other accessories off the electrolytic cell bottle.
2. Remove the electrolyte to be replaced from the electrolytic cell bottle.
3. Clean the electrolytic cell bottle, electrolytic electrode and measuring electrode with absolute ethanol.
4. Dry the cleaned electrolytic cell bottle, electrolytic electrode, etc. in an oven not higher than 50℃.
5. Pour the new electrolyte into the electrolytic cell bottle, and pour the amount of about 150ml (between the two white horizontal lines of the electrolytic cell bottle).
6. Install the electrolytic electrode, measuring electrode, and dry tube sampling plug, etc., and pour new electrolyte into the electrolytic electrode, the amount of which is poured is the same as the electrolyte liquid level in the electrolytic cell bottle.
7. Apply a layer of vacuum grease to all the grinding ports of the electrolytic cell (electrolytic electrode, measuring electrode, injection plug, glass grinding plug).
8. Put the replaced electrolytic cell bottle into the electrolytic cell bottle clamp of the instrument, and turn the instrument to the titration state.
9. The new reagent should be reddish-brown and in an iodine state. Use a 50uL injector to inject about 50-100uL of water until the reagent turns pale yellow.
1. No display
Cause: The power cable is not connected; the power switch is not in good contact.
Treatment: Connect the power cord; replace the power switch.
2. Open circuit of measuring electrode
Cause: The measuring electrode and the instrument plug are not connected well; the connecting wire is broken.
Treatment: Connect the plug; replace the cable.
3. Electrolysis velocity is always zero during electrolysis.
Cause: The electrolytic electrode and the instrument plug are not connected well; the connection wire is broken.
Treatment: Connect the plug; replace the cable.
4. Calibration result of pure water is smaller, when test sample is injected, it can not be detected by instrument.
Cause: The electrolyte loses?efficacy.
Treatment: Replace new electrolyte.
5. Electrolytic process can not be over.
Cause: The electrolyte loses?efficacy.
Treatment: Replace new electrolyte.